Compare the temperature measurement of the Pico
The Raspberry Pi Pico has an internal temperature sensor. The measurements are done via comparing the ADC returned by the sensor with the current ADC of the Pico. I want to compare the internal sensor with an BME280 added to I2C. To record the data I will pull the temperature of both sensors with Homeassistant.
First we need to read the internal sensor on the Pico with MicroPython. For instructions on how to get MicroPython an the Pico and use the REPL see a previous post. Important here, because we want to use WiFi, use the RPI_PICO_W version.
Using the REPL to see the internal temperature:
import machine
adc_voltage = machine.ADC(4).read_u16() * (3.3 / (65536))
temp = 27 - (adc_voltage - 0.706) / 0.001721
print(f"Temperature: {temp:2.1f} °C")
Next, the same for an I2C sensor. I connected the BME280 to GP20 and GP21. There are other options, i.e. GP0 and GP1. The code to see which I2C devices are connected:
import machine
i2c = machine.I2C(0, sda=machine.Pin(20), scl=machine.Pin(21), freq=100000)
print([hex(i) for i in i2c.scan()])
This returns for the BME280: ['0x76'].
We don't want to implement the protocol for a BME280 ourselves, so we use a library that does that.
I chose the one from robert-hh on github.
Using rshell copy the file bme280_float.py to the Pico with cp bme_280.py /pyboard.
Now we try if this worked again with the REPL:
import machine
import bme280_float as bme280
i2c = machine.I2C(0, sda=machine.Pin(20), scl=machine.Pin(21))
bme = bme280.BME280(i2c=i2c)
print(bme.read_compensated_data()[0])
This should return a reasonable temperature value in Celsius as float.
Before adding a webserver to the Pico we need a network connection via WiFi. This is pretty standard and well documented (the tutorial is for the ESP8266, but this works for the Pico, too):
import network
nic = network.WLAN(network.STA_IF)
nic.active(True)
nic.connect('your-ssid', 'your-key')
# check if this worked:
nic.ifconfig()
# for example:
# ('192.168.0.91', '255.255.255.0', '192.168.0.1', '192.168.0.1')
Next is a webserver running on the Pico.
There are lots of alternatives to writing our own minimal webserver, so we have to choose from more or less feature complete ones out there.
I chose microdot because it feels like Flask/FastAPI.
This one has clearly too many features and is quite big for such a small problem, but I like the interface and future possibilities.
We only need the microdot.py, so we copy it the same way as for the bme280 module in the rshell: cp src/microdot/microdot.py /pyboard.
Now a simple example in the REPL (connect to the WiFi first!):
from microdot import Microdot
app = Microdot()

@app.route("/")
async def index(request):
    return "Hello, world!"

app.run(debug=True, port=80)
Copy this to the REPL in 3 steps, to get the indention correct for the index function.
Then connect from your Webbrowser to http://<ip-address-of-your-pico>/ and you should see a "Hello, world!".
We have all parts needed to start a webserver on the Pico with two temperature sensors pulled by Homeassistant.
Save the following code as main.py and copy via rshell to the Pico: cp main.py /pyboard.
After reboot the Pico should answer with two temperature values as json on http://<ip-address-of-your-pico>/.
import bme280_float as bme280
import machine
import network
from microdot import Microdot

app = Microdot()

def connect_wifi():
    nic = network.WLAN(network.STA_IF)
    nic.active(True)
    # set your WiFi here:
    nic.connect('your-ssid', 'your-key')

def get_internal_temp():
    adc_voltage = machine.ADC(4).read_u16() * (3.3 / (65536))
    return 27 - (adc_voltage - 0.706) / 0.001721

def get_bme280_temp():
    i2c = machine.I2C(0, sda=machine.Pin(20), scl=machine.Pin(21))
    bme = bme280.BME280(i2c=i2c)
    return bme.read_compensated_data()[0]

@app.route("/")
async def index(request):
    return {
        "internal_temperature": get_internal_temp(),
        "bme280_temperature": get_bme280_temp(),
    }

connect_wifi()
app.run(port=80)
Adding debug=True in the app.run() didn't work for me when running outside of rshell.
So be aware that printing may block standalone starting.
And finally the Homeassistant setting to poll from this new sensor.
This is added to the configuration.yaml:
rest:
  - scan_interval: 60
    resource: http://192.168.0.91/
    sensor:
      - name: "Pico internal temperature"
        value_template: "{{ value_json.internal_temperature }}"
      - name: "Pico BME280 temperature"
        value_template: "{{ value_json.bme280_temperature }}"
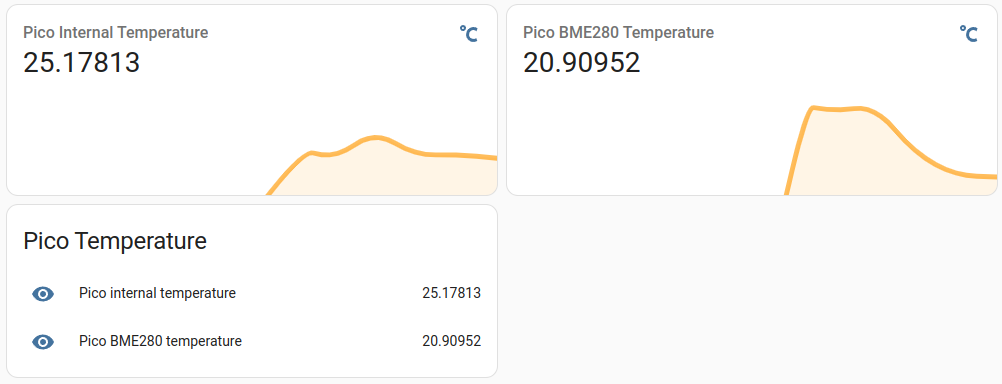
In my Homeassistant dashboard the two sensors are shown like this:
A few days of both sensors shown using InfluxDB/Grafana:
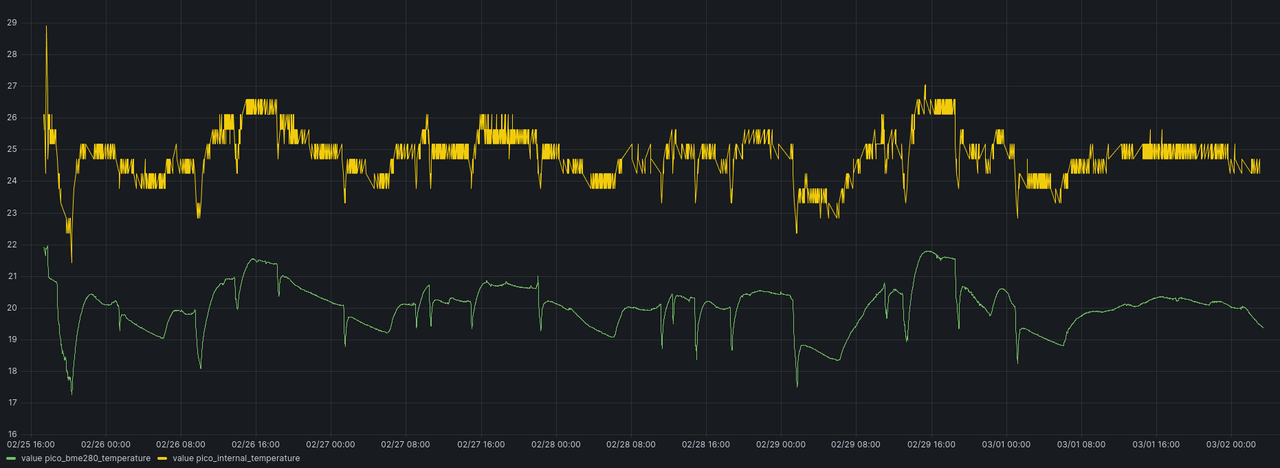
The internal sensor graph is jittering a lot and is clearly a few degrees of. The jittering could be solved by windowing the query in InfluxDB and the temperature error by adjusting the formula. But on the positive side both curves are behaving the same. So if only a temperature delta is needed the internal sensor may be good enough.
The Flux code to get the graph:
from(bucket: "home_assistant")
  |> range(start: v.timeRangeStart, stop: v.timeRangeStop)
  |> filter(fn: (r) => r["entity_id"] == "pico_bme280_temperature" or r["entity_id"] == "pico_internal_temperature")
  |> filter(fn: (r) => r._field == "value")
  |> keep(columns: ["_time","entity_id", "_field", "_value"])