Pico and MicroPython to display GPS data

Thanks a lot to microcontrollerslab.com for a really good starting point by using MicroPython to get GPS data from a NEO-6M using a Raspberry PI Pico.

The things I did differently: I used different Pins on the Pico and I adjusted the code to a more pythonic style.

First the Pins. For I2C I used Pin 20 and Pin 21, the same as in my previous post. And for UART the Pins that are at the bottom of the Pico nearest to the Neo module on my breadboard, which are Pin 16 and Pin 17 for TX/RX.

The code from microcontrollerslab after some refactoring:

import machine
import utime
import ssd1306

def convert2degree(raw_degrees):
    try:
        raw_f = float(raw_degrees)
        first = int(raw_f / 100)
        result = float(first + (raw_f - float(first * 100)) / 60.0)
        return f"{result:.6f}"
    except ValueError:
        return ""

class GPS:
    def __init__(self):
        i2c = machine.I2C(0, sda=machine.Pin(20), scl=machine.Pin(21))
        self.oled = ssd1306.SSD1306_I2C(128, 32, i2c)
        self.gps = machine.UART(
            0, baudrate=9600, tx=machine.Pin(16), rx=machine.Pin(17)
        )

    def display(self, latitude, longitude, satellites, gps_time):
        self.oled.fill(0)
        self.oled.text(f"Lat: {latitude}", 0, 0)
        self.oled.text(f"Lng: {longitude}", 0, 10)
        self.oled.text(f"{satellites} -- {gps_time}", 0, 20)
        self.oled.show()

    def run(self):
        while True:
            parts = str(self.gps.readline()).split(",")

            if parts[0] == "b'$GPGGA" and len(parts) == 15:
                if (
                    parts[1] and parts[2] and parts[3] and parts[4]
                    and parts[5] and parts[6] and parts[7]
                ):
                    latitude = convert2degree(parts[2])
                    if parts[3] == "S":
                        latitude = f"-{latitude}"
                    longitude = convert2degree(parts[4])
                    if parts[5] == "W":
                        longitude = f"-{longitude}"
                    satellites = parts[7]
                    gps_time = f"{parts[1][0:2]}:{parts[1][2:4]}:{parts[1][4:6]}"

                    if latitude and longitude:
                        self.display(latitude, longitude, satellites, gps_time)

            utime.sleep_ms(500)

if __name__ == "__main__":
    g = GPS()
    g.run()

The convert2degree function failed sometimes, so I set latitude or longitude to an empty string when this happens and doesn't display the values on the OLED.

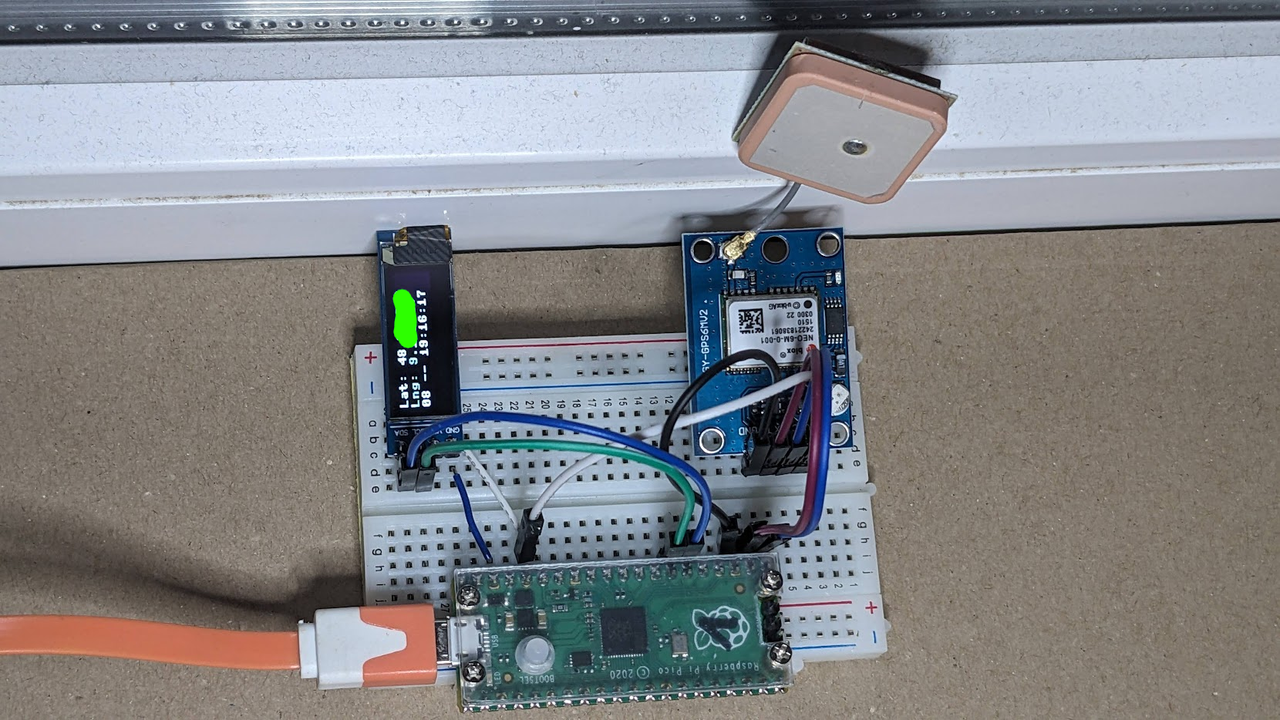
My hardware setup with a Raspberry PI Pico, a NEO-6M module and a 128x32 oled display:

img1

I removed the exact GPS coordinates. At this window I get 8 satellites, which is actually not so bad.

Using OLED Displays with MicroPython and the Pico

Running a Pico without showing something may work for sensors pushing to Homeassistant, but for all other usecases we want to show something on a display. There are a lot of different displays out there. A lot of them are compatible to SSD1306 or SH1106.

So we need the library for SSD1306 on the Pico. For instructions on how to get MicroPython an the Pico and use the REPL see a previous post. We get the Python library we need from the MicroPython Github because it is not bundled in MicroPython itself. Download the file and copy it to the Pico with cp ssd1306.py /pyboard.

First display has 128x32 pixels from Waveshare.

import machine
import ssd1306
i2c = machine.I2C(0, sda=machine.Pin(20), scl=machine.Pin(21))
display = ssd1306.SSD1306_I2C(128, 32, i2c)
# show a simple text
display.text('Hello World', 0, 0, 1)
display.show()

More on the possible functions in the MicroPython Tutorial for the ssd1306.

img1

The same works for a 128x64 I2C display. A small change is needed when initializing the display: change 32 into 64.

I tried a different library for SH1106. As SH1106 library I tested one from robert-hh on Github. Both libraries worked with both types of displays, so the difference seems to be very minimal.

This library has more options, i.e. set a rotation for the display in degrees.

import machine
import sh1106
i2c = machine.I2C(0, sda=machine.Pin(20), scl=machine.Pin(21))
display = sh1106.SH1106_I2C(128, 64, i2c, machine.Pin(16), 0x3c, rotate=180)
display.sleep(False)
display.fill(0)
display.text("Hello World", 0, 0, 1)
display.show()
Another display I have a is 1.3" 128x64 Waveshare with a default to 4-wire SPI.
So for this we need SPI instead of I2C.
The pinout for this display is:
- 3v      - Vcc
- GND     - Gnd
- GPIO 16 - CS
- GPIO 17 - D/C
- GPIO 18 - CLK / SCLK
- GPIO 19 - DIN / MOSI
- GPIO 20 - RES

The MicroPython code to use the display:

import machine
import sh1106
spi = machine.SPI(0, 100000, mosi=machine.Pin(19), sck=machine.Pin(18))
display = sh1106.SH1106_SPI(128, 64, spi, machine.Pin(17), machine.Pin(20), machine.Pin(16), rotate=180)
display.sleep(False)
display.fill(0)
display.text("Hello World!", 0, 0, 1)
display.show()

img2

This covers the different types of OLED displays I have.

Raspberry PI Pico with Micropython

After using ESPHome, I want to experiment more with the Picos without going back to programming in C. So it is MicroPython or CircuitPython. I chose MicroPython because it seems to have more features (i.e. Bluetooth).

First download a current Firmware from https://micropython.org/download/RPI_PICO/ and install via pressing the button on the Pico while connecting to USB. Copy the file on the device and it restarts when done.

On my ArchLinux I need sudo to write to /dev/ttyACM0. To fix this add the group uucp to your user:

sudo usermod -a -G uucp $USER

This is ArchLinux specific. For Ubuntu/Debian it is typically the group dialout.

Next step is to get a REPL and type in some Python. For this I used screen because of old habbit from years ago:

screen /dev/ttyACM0

This small snippet copied into there will let the LED blink every second:

from machine import Pin, Timer
led = Pin(25, Pin.OUT)
timer = Timer()
timer.init(freq=1, mode=Timer.PERIODIC, callback=lambda timer: led.toggle())

More on the timer in the MicroPython docs.

Writing in the REPL is nice but actual files are the way to go. But how to get the files on the Pico? Because I am late here and the MicroPython hype was years ago, the Internet is full of now dead instructions. One that seems to be still active is rshell. This can be pip installed, but I installed the Archlinux package.

When started with rshell it connects automatically to /dev/ttyACM0. To start the same REPL as before with screen type repl in the rshell. Positive here: Ctrl-X to exit the REPL, which was more trouble in screen.

After REPL success lets use a file to do the same. Copy the code into a file on your PC and name it blink.py. In rshell copy the file to the Pico:

cp blink.py /pyboard/main.py

The file main.py is started when the Pico is started. A boot.py is started before, but this may interfere with the REPL, so I chose not to add my own boot.py.

Verify if the file is there (still in rshell):

ls /pyboard

When disconnected and reconnected again the Pico will now let the LED blink. After reconnecting with rshell the blinking will stop again and the filesystem can be changed again.

Thanks to https://blog.martinfitzpatrick.com/using-micropython-raspberry-pico/ for a good rshell/Pico introduction.